Summer in Poland means, besides warmer weather, fresh fruit based dishes. At least to me.
Strawberries served with cream and sugar, blueberry pierogi, plum knedle, blueberry soup and cherry soup made by my mum. All so very tasty and refreshing at the same time!
I enjoy having and making various kinds of food: Southern, Tex-Mex, Asian, Italian or, generally speaking, European. But, sometimes I do crave the meals we had at home in Poland. The familiar/favorite tastes of the cuisine not available here. Since I am not good at making any type of pierogi (I have tried a few times but the
results were rather miserable), I do not even attempt to cook anything
like that these days. That is why, missing the summer Polish dishes, I finally cooked cherry soup. Easy to make and so enjoyable! All you need is the fruit, water, sugar and some cornstarch ( I used Polish potato flour instead). Some time ago I bought a bag of frozen, pitted cherries - I thought I would make a pie. Later I forgot about them. When the crave for the fruit meals came, I had the key ingredient in the freezer, ready to be cooked.
What I used (for two servings):
1 bag (12 oz) frozen (pitted) sweet, dark cherries - I used about 99% of the bag content
water,
3 TBS sugar,
about 1 TBS potato flour (cornstarch),
2 qt pan.
And: 1/2 cup elbow pasta.
What to do with it:
Cover frozen cherries with water and cook (at 4) to boil, add sugar (the soup should be refreshing, not too sweet).
Mix potato flour (or cornstarch) with a bit of cold water, add this mixture to the soup, to thicken it (do not make it too thick!), stir, cook for about two minutes. If it happens that the soup gets too thick, add some more cold water.
Remove from heat and chill.
Cook the pasta according to the instructions provided by its manufacturer.
Serve the chilled soup with pasta.
I had not eaten this kind of soup for about four years, so I was quite happy when I made it. It was sooooooooo good! Next time I will make blueberry soup - soon!
Last week I decided to try a recipe by Jenny Jones (Jenny Can Cook). I chose that recipe because it was supposed to be a recipe for healthy Polish Pączki (donuts) version, and I did feel like having some fresh made pączki. Since the dough is not fried but baked instead (which sounded good to me because I dislike the frying part - so messy!), the donuts turned out to be more like regular yeast buns not real pączki. They tasted really good though and, all in all, I was (we were) really pleased with the results of my work.
My comments on making the donut-buns
The recipe calls for milk but on that day, I had run out of it. At first, I thought I would skip making pączki, but finally, I decided to use half and half instead. Actually, in recipes for 'real pączki' cream is often used.
I made the dough in a traditional way, by hand. I had to use much more flour than it was listed in the recipe (maybe half and half made the mixture wetter and more sticky) - about two cups altogether. After 20 - 25 minutes of kneading and spanking (meaning the dough of course), it was ready to be set aside.
I never use any baking paper so I greased the tin with some butter and floured it a little bit. It worked fine.
I stuffed the donuts with raspberry jam only, did not make the custard filling. Since I had never used 'the stuffing tool' before, I was not sure how much jam I was to squeeze into the buns. I did not want it to be that much as shown in the picture which illustrates the recipe by Jenny Jones. Later it appeared I could have pressed a bit more jam inside each of the donuts than I actually did.
One more thing: when a recipe is long, I usually happen to miss some part of it as (most often) I just scan the text while making the food item, looking for the key information such as eg. required temperature of the oven or time of baking. And I did miss the part on brushing the buns with melted butter. Nevertheless, instead of covering them with powdered sugar only (the buns seemed a bit dry indeed), I decided to glaze them with the thick icing made of powdered sugar and some hot water.
Summarizing the recipe experience: the buns/donuts were really enjoyable and not too sweet. Maybe next time when I am ready for some pączki again, I will brush them with butter too.
We like tacos and, from time to time, have them at various restaurants and Tex-Mex food places. Yesterday we had them for dinner - at home too. They were soooooooooooooooooo good! My husband gave them his big YES! too. The meal was really very enjoyable and, what was also good about it, it was quite inexpensive comparing to eating out. We bought taco shells and taco sauce at Dollar Tree . Both products are very good so there is no need to get them/spend more at a different store.
Some of the ingredients
What I used to make our Pol-Tex tacos:
1 lb ground meat,
taco seasoning,
8 taco shells.
To serve with tacos:
lettuce - cut into small and thin pieces,
1/2 onion - diced,
1 small tomato - diced,
cilantro - we used dried cilantro leaves,
shredded cheese (Mexican style),
taco sauce.
What to do with it all:
1. Brown ground meat.
2. Add taco seasoning and water (follow the instructions provided by the taco seasoning manufacturer).
3. Warm up taco shells in oven (instructions on the box). I kept them in the oven (350F) for 4 minutes.
4. Put the meat and seasoning mixture in your taco.
5. Dress your taco with (whatever you like): taco sauce, lettuce, onion, tomato, cilantro and shredded cheese.
They were best tacos we had had for some time. Surely we are going to have them (at home) more often!
Of course, banana bread made from the scratch is the best but the one we have found at Aldi's is quite good too. Especially considering that the bread comes 'from the box'.
The bread mix contains real bananas. You only need to stir it/combine with some water, oil and eggs. No mixer needed, just a spoon. I also add some raisins and chopped pecans to the bread mixture.
When baked, it tastes really nice so it can be served as a party treat (with no risk of being ashamed of its quality). If you prefer muffins, you can bake them using the mix and a muffin tin.
The bread is very easy to make and it is inexpensive too. We like to have it from time to time.
I created my first decorated cutting board when I was 13 or 14. Then,
there was a long 'no board' break. After quite a long time, I painted
some more and another break came. I was busy with work and other
projects. Recently, I have decided to decorate wooden bread boards again
but, this time, in a totally different way.
The cutting board you can see in the picture below is just a sample of what I intend to do/make.
Let me explain what the paintings are:
Chef Pol-Tex. Since I moved to Texas, I have been the chef of our
Polish-Texan kitchen (I am Polish, my husband is Texan). I make Texan
and Tex-Mex dishes, cakes and pies with a touch of my Polish soul. Or
the opposite: I prepare Polish meals, seasoned in a Texan/Southern way.
We call it Pol-Tex food.
The character painted on the board was created by myself when I was
around 16. Since then, the little 'girl' and quite a band of similar
characters have lived in my notepads and on pages of my notebooks. In a
way, the drawings are part of me. Inspired by my husband, I thought it
is time to show them/myself to the world.
The flowery motifs are symbols of our Polish-Texan home. Some of
them are elements of the traditional Kashubian folk pattern (Kashubia is
the region of Poland I come from). Bluebonnets are, of course, the
State flowers of Texas.
As I mentioned above, this board is just a sample.
MORE PATTERNS TO COME!
If you would like to order a board with similar paintings, please contact us using the online form on the side of this page.
Please note:
I decorate the boards by hand, that is why the pattern on the board
you get may slightly differ from the one presented as a sample.
The board is meant to be a
decorative item only. It must not be used as a kitchen cutting board due
to the layers of paint and varnish which cover the wood.
The price of a board depends on its size and the pattern included on it.
This salad is so easy to make that even a child can prepare it to show his/her father their appreciation. However, a child can work in the kitchen only under the supervision and with the help of an adult. Especially, when using a knife is required. What you need (for 2 servings):
1 slice of red bell pepper
1 slice of yellow bell pepper
1 slice of orange bell pepper ( if you have one kind of bell pepper only, you can use more slices of that)
2 baby carrots
a slice of onion (or 1 green onion)
1/2 bag salad (lettuce) mix
some grated cheese
about 8 salad croutons
your father's favorite salad dressing.
What to do with it all:
Prepare two bowls - one for you and one for your dad.
Put the lettuce mix into a colander, wash it with cold water and
drain it. Divide the lettuce mix into two parts. Put each part into a
bowl.
Cut bell peppers, carrots and onion/green onion into small pieces. Divide each of the cut ingredients into two and put them in the bowls.
Sprinkle some grated cheese on the salad mix you made.
This is a very good recipe if you want to make a tasty apple pie and you do not have too much time to do it or you just do not feel like dealing with apples - peeling and cooking them. I like it a lot as the procedure is simple and the results are always pleasing.
What you need:
1 can apple pie filling
1tsp cinnamon
1 TBS sugar
1 TBS plain bread crumbs
1 recipepastry for a 9 inch double crust pie
1 egg yolk
What to do with it all:
Heat oven to 350F.
Mix apple pie filling with cinnamon, sugar and bread crumbs.
Place the bottom crust in the baking dish.
Spread apple pie filling mixture on it.
Put the upper crust on the apple filling mixture. Seal the edges of both crust layers.
Brush the upper crust layer with egg yolk.
Prick the upper crust layer with a fork.
Bake it for about 38 minutes - till the crust is a bit brown - do not burn it.
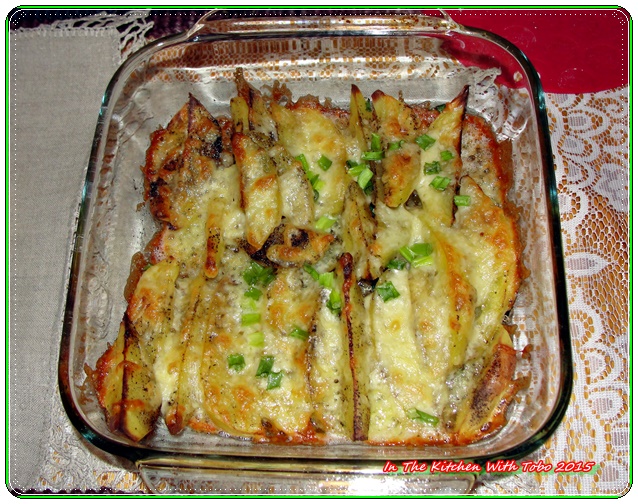
This is one of our favorite 'potatoes for dinner' options.
What you need (for two servings):
1/3 cup half and half,
1/3 cup 2% milk,
1/4 tsp garlic powder (or one garlic clove sliced/crushed),
salt and pepper,
3 - 4 medium size potatoes,
grated cheese of your choice
and also: baking dish, some butter to grease the baking dish, aluminum foil. Procedure:
1. Heat oven to 375F/ 190C
2. Heat the milk and half and half + garlic in a pot on the stove (set it to #4).
2. Peel and slice the potatoes (each slice = 1/5 inch thick).
3. Grease your baking dish slightly.
4. Place 1 layer of sliced potatoes in the baking dish (see the picture).
5. Season the potatoes with salt and pepper.
6. Pour a bit of the milk and half and half mixture over the potatoes.
7. Place another layer of sliced potatoes into the dish, repeat step #5 & #6 etc.
8. Cover the dish with aluminum foil. Bake the potatoes for 20 minutes.
9. After 20 minutes, remove the foil and bake for 20 minutes more.
10. Take the dish out of the oven, cover the potatoes with grated cheese.
11. Bake it all for 10 minutes till the cheese is melted and a bit brownish on sides.
Easy to make. I do not know why it is called Boston cake but it is both simple and tasty.
What you need to prepare the cake:
yellow cake mix,
instant vanilla pudding (5.1oz/145g),
creamy chocolate frosting.
Make the yellow cake - follow the instructions included on the box ( I baked it in two 9'' tins).
Make the pudding - add less milk than it is stated on the pudding package ( 2 glasses instead of 3).
Chill the pudding in the fridge.
After a few hours, when the cake is no longer warm, spread the pudding on the first layer of the cake, put the other one on it and cover it with the frosting (we used chocolate fudge frosting). Refrigerate the cake (store it in the fridge), it is best when chilled. Enjoy!
Shepherd's Pie is one of the dishes which I learned to make when in TX. Actually, it is not popular in Poland at all, and I did not hear about it before coming to the US.
This is the way I make it and how we like it best.
What you need (for two servings):
1/2 pound ground beef
some canola oil (for frying)
1/2 medium size onion - chopped
1 cup water + 1/2 beef bullion cube (or 1 cup beef stock)
1 TBS Worcester sauce
about 1/3 cup frozen peas & carrots (or more if you like)
1 TBS dried parsley
1/4 tsp black pepper
For mashed potatoes:
4 medium sized potatoes
1 TSP unsalted butter
about 1 tsp salt
a pinch black pepper
1/4 2% milk
grated Mexican cheese (or other kind) to cover mashed potatoes
What to do:
1. Heat oven to 350F/175C
2. Boil the potatoes.
3. Mash the potatoes, add butter, milk, salt and pepper.
4. Fry the meat until it is no longer red (it takes a few minutes).
5. Add the chopped onion and fry it with the meat for about 3 minutes.
6. Add water & bullion cube, Worcester sauce, frozen peas & carrots, and cook it all for about 7 minutes. Add parsley and stir everything.
7. Place the meat mixture into a baking dish, cover it with mashed potatoes, spread them evenly.
8. Sprinkle shredded cheese on the potato layer.
9. Bake it for 30 minutes.
I do not cover the dish with aluminum foil before placing it in the oven. I did that a few times but the potatoes + cheese turn out/taste better when they are baked without any cover .
From all the mashed potatoes - flakes and instant powders which we have tried, this Idaho Supreme product is definitely the best. Mashed potatoes made with these Idaho Supreme potato flakes are always tasty and fluffy. Thanks to the very clear instructions included on the box, I can easily prepare
various numbers of servings, according to our current needs. What I need to add is water, milk and some butter. The only thing which I do differently than ' the manual' says - I heat milk with water and butter instead of mixing hot water, butter and potato flakes with cold milk. I tried the latter one when I was making Idaho Mashed Potatoes for dinner for the first time, but the potatoes turned to be too cool then.
We bought the product at Dollar Tree and we were positively surprised with its quality. Of course, the price was excellent too.
To sum up, so far, Idaho Supreme Mashed Potatoes has been our choice no. 1 considering buying instant mashed potatoes.
I also use the potato flakes to prepare chicken breast for dinner - it is a very easy and quick recipe.
Products you need (for two servings):
1 big chicken breast
some grated Parmesan cheese
some salt*
some black pepper*
1 large egg
1 TBS water
some Idaho Supreme Mashed Potatoes flakes
a little canola oil/olive oil
baking dish and oven of course :)
* the amount of salt and black pepper depends on your likes but do not add too much
What to do wit it all:
1. Heat oven to 375F/190C.
2. Grease your baking dish and heat it in the oven for 5 minutes.
3. In the meantime:
bowl no.1 - mix Parmesan with salt and black pepper;
bowl no. 2 - mix egg with water, beat it a little bit with fork;
4. Coat chicken breast - bowl no.1, 2, and then no. 3.
5. Put the coated chicken breast on the baking dish, sprinkle it with some oil and bake it for about 10/15 minutes, then turn the meat and bake it for 15 minutes again.
In Poland horseradish is traditionally served, especially at Easter, with different kinds of meats. The condiment consists of a few ingredients only: a grated horseradish root with some lemon juice or very little vinegar, cream, and a bit of sugar. Depending on the 'strength' of the horseradish, the mixture has usually has quite a bold flavor. I love how it tastes with sausages, meat sandwiches or baked meat.
I have been trying to find a similar horseradish based product here but so far with no success. That is why I was really happy when I came across this Calder's Gourmet Bold & Zesty Horseradish Sauce. It is very tasty and quite 'horseradishy' comparing to other sauces. The best of all I have tried in the US so far as it is not sweet, not bitter, and there is not too much mayonnaise in it. It adds a lot to the flavor of meats, and also works well as raw chicken breast seasoning. The horseradish sauce was made in the USA and it costs $1 only.
The horseradish sauce was found at Dollar Tree
Chicken Breast in Bold & Zesty Horseradish Sauce
Heat oven to 375F/190C
Rub chicken breast with horseradish sauce.
Then coat it with plain bread crumbs - press bread crumbs a bit to make them stick to chicken breast better.
Grease a baking dish with some butter and put it into hot oven for 5 minutes.
Place chicken breast in the baking dish and bake it for 10 minutes.
Turn chicken breast and bake again for about 15 minutes.
Slow cookers are not very popular in Poland. These days they are available in stores there, not too many kinds though (I checked some online stores today). I guess, people have not learned yet what a useful invention it is. Actually, I never came across anything like that while living in Europe. We had the opposite of that - fast pressure cooker which my sister had received as a wedding gift. She did not want it and gave it to us but we never used it either. We simply did not need it. Besides, we were a bit concerned about the safety matters connected with cooking in it.
The slow cooker is totally different. At first, I was not sure what I could do with it - I simply did not know the kitchen device at all. Encouraged by my husband, I decided to give it (and myself) a try. The results were great! Nowadays, I really enjoy using the slow cooker. I also very much like what I learned about it: the slow cooker (called also the crock-pot - did not know that) is safe and makes life easier. You just put all the ingredients into the pot - and that is all. No need to stand by it and check on its content all the time, which is most often necessary while cooking on the stove. Another important advantage is that food prepared in the slow cooker is always tender and tastes really good.
A few years ago, at a function/social meeting, we were treated with (among others) southern style beans. The dish tasted so good, that we asked the lady who had made it (cannot recall her name) to share her recipe with us. I am very grateful she was so kind and did write it down for me - since then, it has been one of our most favorite recipes. Having cooked the beans many times, both on the stove and in the slow cooker, I can say that the only right way to do it well, is to cook them with the help of the crock-pot. The grains are so tender and not overcooked - just perfect.
Here is the recipe. It is very simple and the beans make a great dish both for a family dinner and as a guest/party treat.
Beans
Ingredients:
1 pound bag Casserole Pinto Beans/or just dried pinto beans
4 slices ham
1 tablespoon salt
1/4 teaspoon pepper
water to cover the beans (check the bag instructions)
Procedure: I always put the dried beans into a bowl, cover them with cold tap water and leave for a night - but it was not included as an instruction in the original recipe.
Sort the beans, remove cracked or rotten beans. Rinse thorough with water. Strain.
Put the washed beans into the crock-pot.
Chop ham into small pieces and put in the crock-pot with beans.
Boil water in a separate pot on the stove.
Pour the boiling water in the crock-pot, turn it on 'high'.
Add salt.
Cover and let cook for 4 hours undisturbed. Do not stir.- this is my favorite part - if you cook the beans on the stove, you have to stir them often and check- often - how much water there is in the pot.
*It is best if the slow cooker has a see through lid, so you do not have to remove it to check how the cooking is going. The more times you open the lid, the longer it takes to cook.
* If you run low on water, boil more on the stove, the add boiling water to the crock-pot. Never add cold water, it will turn the beans black.
Beans cooked in the slow cooker
Together with corn bread, the beans make a great traditional, southern style meal. I have tried many corn bread recipes but we finally decided, that the one included below is the best.
I do not have a cast iron so I use a round, 9'' metal cake tin. As you can see in the picture, the corn bread baked in it turns out rather thin, but we like it in this way. If you want to make it thicker, just double the amount of all the ingredients.
Corn Bread
Ingredients:
1 TBS canola oil (or olive oil/or any vegetable oil)
1 cup corn meal
1/6 cup all purpose flour (a half of 1/3 cup)
1 tsp baking powder
1/2 tsp baking soda
1 TBS sugar
1/2 tsp salt
1 egg
about 1 and 1/2 cup buttermilk
1 medium sized carrot (I use about 4 or 5 baby carrots)
Procedure
Grate the carrot.
Heat the oven 400F.
Pour the oil into the baking tin. Put the tin into the oven for minutes.
Put all the other ingredients into a bowl and stir with a spoon.
Take out the baking tin from the oven. Carefully pour the hot oil into the bowl with corn bread ingredients, and stir with a spoon again.
Pour the mixture into the tin and bake for 20 or 25 minutes - until a toothpick comes out clean.
our favorite kind of home made corn bread
Warm, straight from the oven, corn bread with some butter + the beans = a wonderful treat.
Having moved to the US I experienced many 'first times': doing things
and going to places, and also having different kinds of food. There was
my first taco, my first Tex-Mex food, my first glass of Dr. Pepper, my
first mac & cheese, and many more, including my first Banana Split.
It is a delicious treat, however, it is so big that I am able to eat
only a half of it. But I do like it!
The Banana Split in the picture was not my first one - just another one.
Among others, I also learned about the Pineapple Upside-Down cake here
(had neither heard about it nor tasted it in Europe). And of course I
decide to make it. I found a ''from the scratch" recipe and baked it -
first time. The cake looked very nice but, according to a Pineapple
Upside-Down Cake Expert, it did not taste as it was supposed to.
Pineapple Upside-Down Cake - attempt #1
A year later, I decided to make the cake again, using a different recipe
though. I did not know that I was supposed to flip the tin straight
after taking it out of the oven. It looked quite alright and I just put
the upside-down cake on a cupboard. The result was obvious to everybody
who had made such a treat before (but not me, at least not then). All
the juice was at the bottom of the baking dish. I called it 'a day of
the swimming cake'. Of course my upside-down cake no.2 was not good
enough to eat it.
Pineapple Upside-Down Cake - attempt #2
Another year passed, and the time came to bake it again. This time I
decided to get a yellow cake mix to make things different. I used the
same baking tin as usual. Well, unfortunately, it appeared to be too
small and some of the brown sugar, light corn syrup and butter mix
dripped from the tin on the bottom of the oven. To make matters worse,
the baking time given in the recipe, which I followed, was wrong - much
too short, so I started opening the oven and checking the cake too
early. The result: the worst cake I had ever made. Anyway, a good side
of that experience and all the previous ones was that I finally
understood the Nature of the Pineapple Upside-Down Cake.
I was determined to make it right so I did not wait another year. After a
few days I tried again - with a bigger baking dish and knowing all what
I had learned. Attempt #4 was very successful, which was confirmed by
the Pineapple Upside-Down Expert. I was happy! Now I know how to make it
and bake it well. :)
We bought this rice because we were curious what kind of rice it was. Besides, we wanted to try something new. What we could read on the package encouraged us to choose the Basmati rice: 'Authentic Indian Basmati Rice. Naturally aromatic long grain rice. Grown in the foothills of the Himalayas.'
And we are not disappointed with the purchase - just the opposite: the rice is tasty, and when cooked, it is tender and fluffy, without the usual 'sticky rice' effect. According to what I have learned from the Internat research, the Basmati rice is also healthier than a regular white rice as its glycemic index is lower.
It does not take much time to cook it - I usually cook 1/3 cup of rice for the two of us (add a little oil, about a cup of water and a quarter of a bullion cube). When the water boils, it is time to cover the pot and cook the rice until the water is absorbed. Usually it all last around 10 minutes. However, I observe the rice - stir it when it gets dry and check whether it is soft enough. If it is not, I add some more water (not much!) and cook, covered, a bit longer. When it is ready, just stir the rice with a fork and serve. If it happens that there is still some water at the bottom of the pot, I uncover it and stir the rice delicately with a wooden spoon (the burner is still on). It helps to get rid of the water as it evaporates while stirring.
Other advantages of Basmati rice (information from the packaging):
I have mastered making Chicken Quesadillas (thanks to a great recipe by Ree Drummond - The Pioneer Woman). The ones made at home are much better than the quesadillas served by a local food place. With Tex-Mex rice (made by myself also) and refried beans, these Chicken Quesadillas make a great dinner.
First time when I was asked whether I would like some mac & cheese, I did not know what the 'mac' stood for. When I learned that fish is traditionally served here with macaroni and cheese, I was quite surprised. I would have never thought of such a meal configuration before. Where I
come from, fish is always served with potatoes - either fried (french
fries) or boiled, but never with elbow shaped pasta and cheese! Nevertheless, the
two and fish match quite well and I learned to like it. Mac & Cheese goes nicely with fried meat too.
I have tried quite a few mac & cheese recipes, including making it on the stove, but this one seems to be the best of all.
The Easter goodies you can see in the pictures below are already gone but it is nice to think how delicious they were.
The cake was so good, moistened and not too sweet. It can be a really good birthday or any other holiday cake too. I did not have a kind of butter cake mix which was required in the original recipe, so I used what I had - a cake mix with 1/3 cup vegetable oil as an ingredient. That is why while making the cake I skipped butter of course. Besides that, I followed the instructions given by The Southern Lady in her post. The Mandarin cake was a true success.
I used two round, 9" cake tins - my cake had two layers not three though. Another great recipe worth keeping!
Mandarin Orange Cake
These deviled eggs were my first try ever. Next time, to adjust the taste of eggs to our likes, I will certainly add some more mustard and sweet relish than the recipe says. We liked them anyway, but they could have been a bit more spicy.
This recipe also comes from the Southern Lady pages
After Easter:
Egg Leftovers - I used them to make a quick salad:
one big potato - peeled, cooked and diced.
2 pickles - diced
2/3 TBS mayonnaise
salt & pepper to taste
deviled eggs - leftovers - diced
You just need to mix all the ingredients and the salad is ready. I enjoyed it even more than the eggs themselves.
While having a meal, it often happens that some bread crumbs land on the table, making it a bit messy. To clear it, there is no need to remove the table cloth, you just need to find the right equipment.
before Easter...
A little table sweeping set is quite useful and convenient then. You just sweep the table/table cloth and all the crumbs go onto the little shovel, and your eating space is tidy again. My mum used to have quite a stylish table sweeping set, which she had received from her mother. It was made of metal, nicely decorated with a fancy pattern. The sweeping brush was a bit shorter and made of some very soft something. All in all, it looked more like a prop from 'Downton Abbey times'. Guess, maybe it was though not literally of course. The set I have is both simple and inexpensive which actually is a great advantage. Since it is not too big, you do not need much space to store it either.
Time to start getting ready for Easter. I am going to be busy with baking and preparing for the holiday. More on the results of mu Easter actions soon....
This cake is actually called German Marble Cake. While making it, I swirled the cacao and yellow batter with a knife, probably more than it was required in the recipe. I did that as I do not like the bitter taste the cocoa layers in any cake.
The overall effect is quite good, as the cake is tasty and not too sweet. However, I skipped making the chocolate mocha frosting (see the recipe) to have a lighter treat and to adjust it to our tastes also (not everybody likes coffee as an ingredient). Besides, the swirly pattern, which would be covered by the frosting, made the entire cake look quite interesting.
All in all, it is a good and easy to make coffee cake.
I love trying new (to me), traditional, Southern recipes. Of course I am always glad when we are pleased with the results of my tries. Recently, I have mostly made some new/old cakes. The one you can see in the picture is a yellow cake (made from a scratch) - a very useful and easy recipe which can be a basis for various baking creations. The fudge-like frosting reminds me the taste of the Polish fudge called 'Krowka'. All in all, together with the cake, it makes a deligthful (but quite sweet) dessert.
To bake the cake, I used two round 9" meatl tins (baking time was 20 minutes). Unfortunately, when I was making it, I had not enough vanilla extract to add to the frosting, which did not spoil its flavour though. However, next time I will cut down on white sugar, to make the frosting a bit lighter.
I followed the original recipe (with white sugar for the frosting). It was not difficult, you just need to cook and boil the fudge mixture long enough, stirring it all the time. It makes the white sugar dissolve/ change its structure and blend with all the other ingredients. As you can see I put pecan halves on both layers of the frosting. It makes the taste of the cake even more interesting.